Price from your costs, not a competitor’s quote
Good pricing is cost-plus: add up what the job costs you, then add a margin that keeps your business running. Copying a rival’s headline number tells you nothing about whether you make money on this job. It is better to lose some jobs than to win them at a price you cannot sustain your business on.
Once the design is settled, open Costs & Pricing in Photonik Pro. The sections below follow the same order as the screen — work down the page as you work down the build-up.
The cost stack
Three groups of cost go into every job:
- Equipment — panels, inverter, battery, mounting and racking, cabling and the small electrical parts (the “balance of system” that is easy to forget).
- Labour — install crew and electrician time.
- Overheads — travel, design time, permits and paperwork, access such as scaffolding, admin, and after-sales support.
Check the overheads line before you add margin. Travel, design, permits, access, and after-sales support all still need paying, even when they’re not on the invoice as a line item.
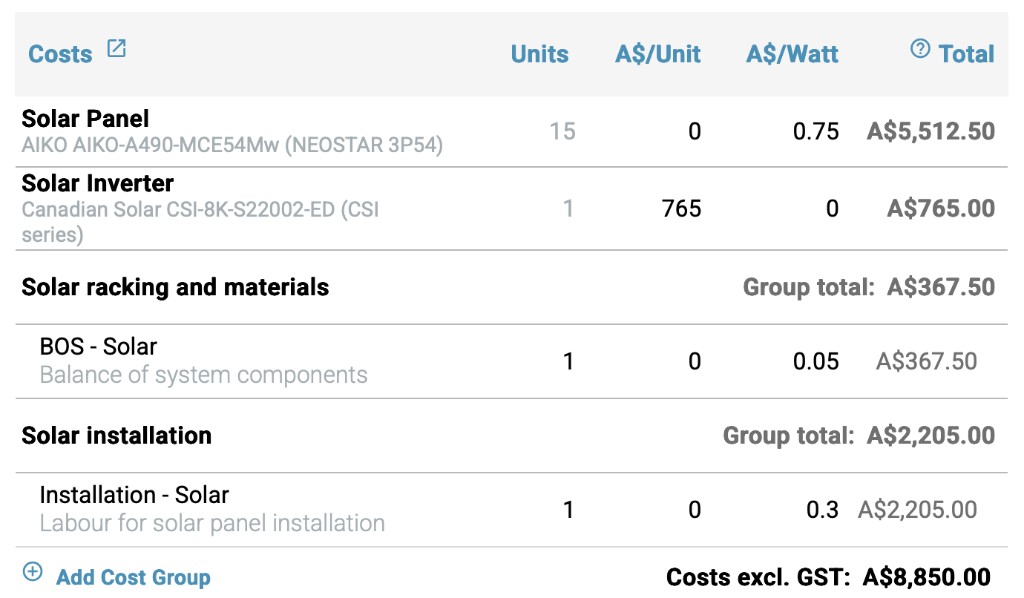
In Costs & Pricing, costs sit in cost groups (for example Equipment, Labour, Other). Each line item has two levers:
- $/unit — a fixed amount multiplied by quantity. It does not change with system size. A permit fee or a day of labour is a $/unit cost.
- $/W — an amount multiplied by the total system watts, so it grows with a bigger system. Racking or cabling often sit here.
A line can use one lever or both. Group and job subtotals update as you type.
How to add your margin
There are three ways to add margin, and you can combine them:
- A flat fee per job — a fixed amount that covers the baseline cost of turning up and running the business.
- A percentage of cost — margin that rises and falls with the price of the kit.
- A rate per watt — margin that scales with the size of the system.
Be careful with percentage margin. When your profit is a percentage of cost, you earn more every time the customer chooses pricier, better kit — and less when they choose cheap kit. That quietly pushes customers toward the cheapest equipment to keep the quote down. Cheap kit fails more often, and you are the one called back to fix it under warranty.
Recommended: a flat fee per job plus a rate per watt, and leave percentage at zero. Your margin then reflects the work and the system size, not the brand of panel. This is why Photonik’s default pricing is a flat fee plus a per-watt rate, not a percentage.
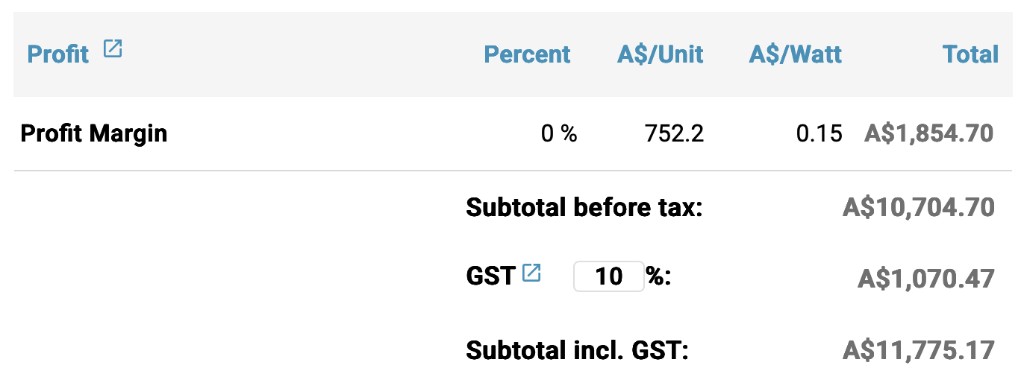
On the Profit row in Costs & Pricing, three inputs add together: Percent, $/Job (a flat fee for the job), and $/Watt. A practical setup many installers use:
- Leave Percent at 0.
- Set $/Job to your flat per-job fee.
- Set $/Watt to your per-watt margin.
If you have a preferred pricing or profit method, you can save it as a template.
Tax
Tax (VAT or GST in most markets) is normally added on top of your price before tax; some markets treat solar differently. You just need to know where it sits in the build-up so the final figure is right.
Enter your tax rate as a percentage in Costs & Pricing; it is applied to the subtotal before tax. A fixed amount and a cap are available where a market needs them.
Rebates, discount, and price to customer
Incentives reduce what the customer pays without reducing what you are paid — the mechanism varies by market (an up-front discount, an assigned certificate, or a tax credit). The decision they create is presentation: quote the full price and show the rebate as a deduction, or quote the already-reduced price? Showing it as a deduction usually makes the value clearer to the customer.
A discount is different: it does not come off your costs — it comes off your profit. A small percentage off the price can be a large share of your margin, so treat discounting as a deliberate choice, not a reflex in negotiation.
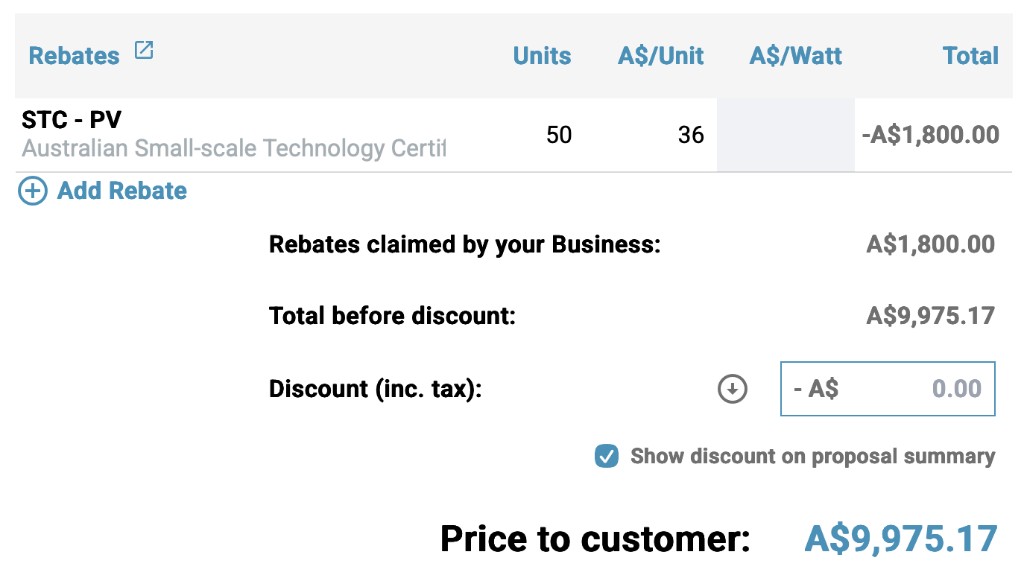
In Costs & Pricing, add each rebate as either an absolute amount or a percentage, choose what it is calculated on, and set whether it is claimed by you or passed to the customer. A cap is available where the scheme limits the amount.
Below rebates, the Discount (inc. tax) row adjusts the final price. Type an amount directly, or use the round-down button (down-arrow icon): by default it rounds the total down to the nearest $100, then subtracts $10 (for example, $9,975.17 becomes $9,890). Tick Show discount on proposal summary if you want the customer to see it on the proposal.
The price to customer at the bottom is the figure you present in Step 10 — Design and proposal review.
Before step 10
- Confirm cost groups, margin, tax, rebates, and price to customer in Costs & Pricing.
- Continue to Step 10 — Design and proposal review to walk the client through the proposal.